
- Posts: 97
- Thank you received: 0
Kunena 6.3.0 released
The Kunena team has announce the arrival of Kunena 6.3.0 [K 6.3.0] in stable which is now available for download as a native Joomla extension for J! 4.4.x/5.0.x/5.1.x. This version addresses most of the issues that were discovered in K 6.2 and issues discovered during the last development stages of K 6.3
Topics that are moved into this category are generally considered to be closed. Users may want to add additional information but these topics should not be resurrected in order to discuss new problems or unrelated matters.
Solved Are there steps to install not using the url method
- dianaNashif
-
 Topic Author
- Offline
- Senior Member
Less
More
11 years 11 months ago #1
by dianaNashif
Are there steps to install not using the url method was created by dianaNashif
Since my upgrade install of 1.7.2 is failing using the url method as stated in the instructions, can I install via the upload option? If so, do I browse to the the zip file (downloaded) or do I have to unpack it or something like that.
Is there anything else I need to do?
I am new to Joomla and Kunena forum, so sorry for being so perplexed....
Please can anyone help me!
Diana
Is there anything else I need to do?
I am new to Joomla and Kunena forum, so sorry for being so perplexed....
Please can anyone help me!
Diana
Please Log in or Create an account to join the conversation.

11 years 11 months ago - 11 years 11 months ago #2
by sozzled
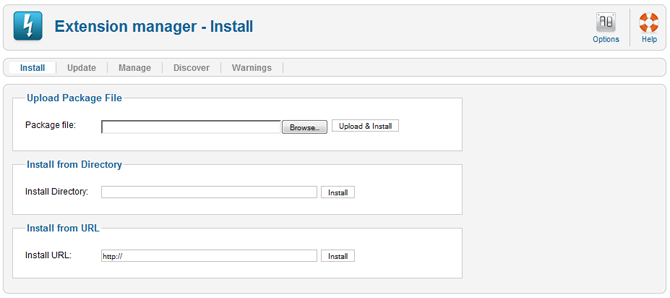
Joomla! extensions can be installed using one of three methods, as indicated below. Only one method is needed to install a given extension.
The normal procedure for installing a Joomla! extension is as follows:
Our recommended installation procedure is explained in K 1.6 & K 1.7 Installation Guide
I hope that helps.
Blue Eagle vs. Crypsis reference guide
Read my blog and

Replied by sozzled on topic Are there steps to install not using the url method
Joomla! extensions can be installed using one of three methods, as indicated below. Only one method is needed to install a given extension.
The normal procedure for installing a Joomla! extension is as follows:
- Download one or more archive files (normally ".zip" or "tar.gz" format) from the extension provider's web site to a local directory on your computer. Note that some extensions are installed as one file (for example, one component or module) while other Extensions might have two or more files (for example, a component and a module). If there are two or more parts, each one will have its own archive file.
- Choose one of the methods describe below (usually Package File)
- When it is finished, the screen will display the message "Install Component Success". If the installation is not successful, an error message will display.
- Depending on the extension, it may be necessary to enable the extension (for example, in the Module Manager or Plugin Manager).
- Package File. (the common way)
- Browse to the location where you downloaded the extension's archive file.
- Then press "Upload File & Install". Joomla! will read the contents of the archive file and install the extension.
- Install Directory. As an alternative to installing from an archive file, you can follow the steps below:
- Create a temporary directory on your local hard drive and unpack the Extension's archive file in this temporary directory.
- Using FTP, upload the contents of this directory (including files and subdirectories) to a directory on your server.
- In the Install Directory field specify the server directory where you uploaded the files and subdirectories of the package.
- Click on the Install button and Joomla! will install the contents of the given directory.
- Install URL. A third alternative for installing an extension is as follows. Instead of downloading the archive file to your local computer, just specify the URL of the target archive file. Then click the "Install" button and Joomla! automatically installs it directly from this URL. Note that, with this method, you will not have a copy of the archive file on your local computer.
Our recommended installation procedure is explained in K 1.6 & K 1.7 Installation Guide
I hope that helps.
Blue Eagle vs. Crypsis reference guide
Read my blog and
Last edit: 11 years 11 months ago by sozzled. Reason: Change topic icon
The following user(s) said Thank You: dianaNashif
Please Log in or Create an account to join the conversation.
- dianaNashif
-
Topic Author
- Offline
- Senior Member
Less
More
- Posts: 97
- Thank you received: 0
11 years 11 months ago #3
by dianaNashif
Replied by dianaNashif on topic Are there steps to install not using the url method
Biggest thank you, thank you...........all fixed, uploaded and my forum is back. You just made 35,000 members very happy Sozzled.
Please Log in or Create an account to join the conversation.
Time to create page: 0.477 seconds